物体绘制三要素
- 几何体
- 材质
- 网格模型
创建示例
常见的几何体在文档的Geometries中查看
// 结构
const geometry = new THREE.CylinderGeometry(1, 1, 1, 3);
// 材质
const material = new THREE.MeshBasicMaterial({ color: 0xffff00 });
// 组合
const cylinder = new THREE.Mesh(geometry, material);
// 位置
cylinder.position.set(-2,0,2)
// 加入场景
scene.add(cylinder);
自定义几何体
如果需要复杂的几何体,可以使用BufferGeometry进行绘制
自定义物体绘制
// 自定义物体
// 创建几何体
const customGeometry = new THREE.BufferGeometry();
// 顶点坐标,3个坐标组成一个顶点,逆时针方向为正面,默认只能看到正面
// 以每个三角形为一个面进行绘制,也就是绘制正方形就需要在加3个坐标点数据,如果想共用顶点需要使用索引绘制
const customCube = new Float32Array([0, 0, 0, 1, 0, 0, 0, 1, 0]);
// 顶点属性
customGeometry.setAttribute(
  "position",
  new THREE.BufferAttribute(customCube, 3) // 3个坐标组成一个顶点
);
// 创建材质
const customMaterial = new THREE.MeshBasicMaterial({
  color: 0x00ff00,
  side: THREE.DoubleSide, // 双面都能看见
  // wireframe: true,
});
const customPlane = new THREE.Mesh(customGeometry, customMaterial);
scene.add(customPlane);
共用顶点
索引绘制,共用顶点
// 创建几何体
const customGeometry = new THREE.BufferGeometry();
// 顶点坐标,3个坐标组成一个顶点,逆时针方向为正面,默认只能看到正面
const customCube = new Float32Array([0, 0, 0, 1, 0, 0, 0, 1, 0, 1, 1, 0]);
// 顶点属性
customGeometry.setAttribute(
  "position",
  new THREE.BufferAttribute(customCube, 3) // 3个坐标组成一个顶点
);
// 顶点索引指定,0表示第一个顶点,前3个顶点确定了三角形,又使用后三个顶点确定一个三角形,即是四边形
customGeometry.setIndex([0, 1, 2, 1, 2, 3]);
// 创建材质
const customMaterial = new THREE.MeshBasicMaterial({
  color: 0x00ff00,
  side: THREE.DoubleSide, // 双面都能看见
  // wireframe: true,
});
const customPlane = new THREE.Mesh(customGeometry, customMaterial);
scene.add(customPlane);
不同材质
// 创建几何体
const customGeometry = new THREE.BufferGeometry();
const customCube = new Float32Array([0, 0, 0, 1, 0, 0, 0, 1, 0, 1, 1, 0]);
customGeometry.setAttribute(
  "position",
  new THREE.BufferAttribute(customCube, 3)
);
customGeometry.setIndex([0, 1, 2, 1, 2, 3]);
// 分组
customGeometry.addGroup(0, 3, 0); // 第一个面,前3个顶点,使用索引第一个材质
customGeometry.addGroup(3, 3, 1); // 第二个面,前3个顶点,使用索引第二个材质
const customMaterial1 = new THREE.MeshBasicMaterial({
  color: 0x00ff00,
  side: THREE.DoubleSide,
});
const customMaterial2 = new THREE.MeshBasicMaterial({
  color: 0xff0000,
  side: THREE.DoubleSide,
});
// 指定材质数组
const customPlane = new THREE.Mesh(customGeometry, [customMaterial1, customMaterial2]);
scene.add(customPlane);
材质
Material
贴图操作
// 结构
const geometry = new THREE.BoxGeometry(1, 1, 1, 3);
// 材质
const loader = new THREE.TextureLoader()
const texture = loader.load('../img/01.jpg')
const material = new THREE.MeshBasicMaterial({
  map: texture,
  aoMap: xxx, // 阴影贴图
  alphaMap: xxx, // 透明度贴图
  lightMap: xx, // 光照贴图
  transparent: true // 允许透明度,黑白图,黑色为透明
});
// 组合
const cylinder = new THREE.Mesh(geometry, material);
// 位置
// 加入场景
scene.add(cylinder);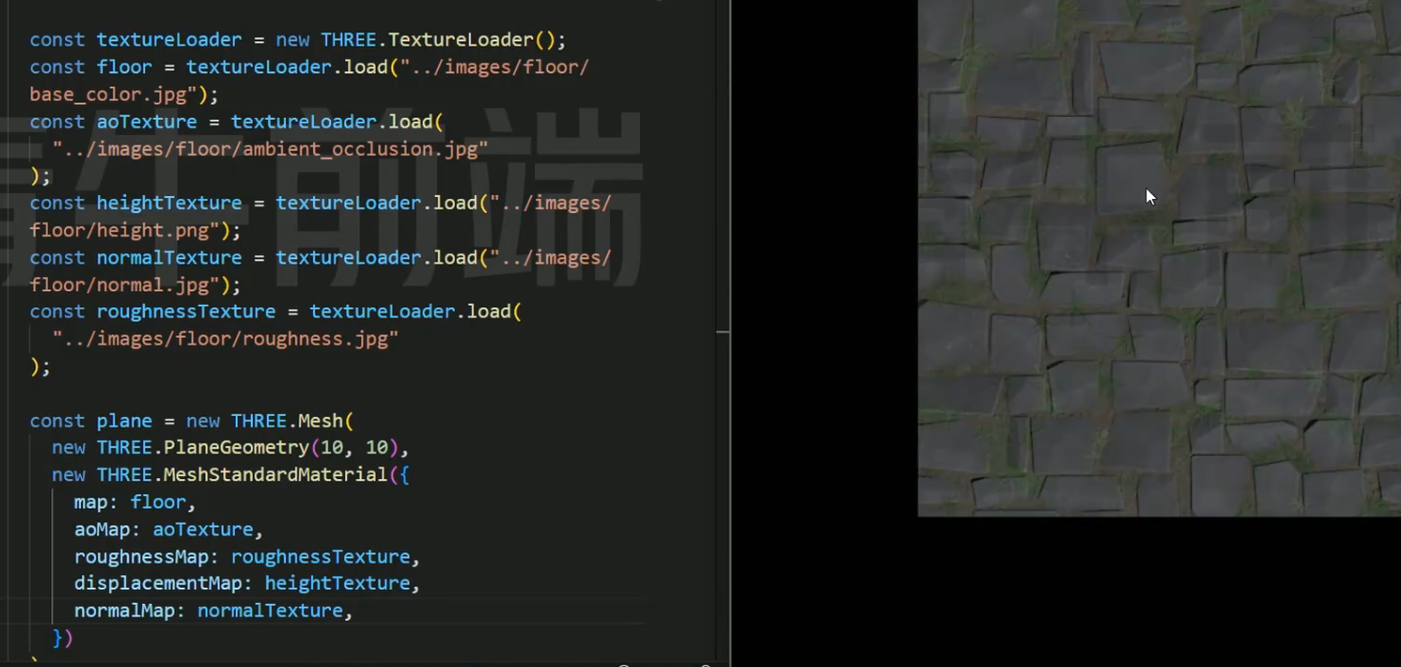
高光
有些材质不支持
// 结构
const geometry = new THREE.SphereGeometry(3, 30, 30);
// 材质
const loader = new THREE.TextureLoader()
const texture = loader.load('../img/01.jpg')
const material = new THREE.MeshStandardMaterial({
  // color: 0xffffff,
  map: texture,
  roughness: 0.5,
  metalness: 0.5
});
// 组合
const cylinder = new THREE.Mesh(geometry, material);
// 加入场景
scene.add(cylinder);
阴影
需要渲染器,物体,关照开启阴影支持
import * as THREE from 'three'
import { OrbitControls } from 'three/addons/controls/OrbitControls.js'

// 创建场景
const scene = new THREE.Scene()

// 创建相机
const camera = new THREE.PerspectiveCamera(
  45,
  window.innerWidth / window.innerHeight,
  0.1,
  1000
)
camera.position.set(2, 9, 10)
camera.lookAt(0, 0, 0) // 观察方向

// 创建渲染器
const renderer = new THREE.WebGLRenderer({
  antialias: true
})
renderer.setSize(window.innerWidth, window.innerHeight)
// 开启阴影
renderer.shadowMap.enabled = true
document.body.appendChild(renderer.domElement)

// 平面
const planeGeometry = new THREE.PlaneGeometry(10, 10);
const planeMaterial = new THREE.MeshStandardMaterial({ color: 0xffffff, side: THREE.DoubleSide });
const plane = new THREE.Mesh(planeGeometry, planeMaterial);
plane.rotation.x = -Math.PI / 2
// 被投射物体阴影
plane.receiveShadow = true
scene.add(plane);

// 物体
const geometry = new THREE.SphereGeometry(1, 30, 30);
const loader = new THREE.TextureLoader()
const texture = loader.load('../img/01.jpg')
const material = new THREE.MeshStandardMaterial({
  // color: 0xffffff,
  map: texture,
  roughness: 0.5,
  metalness: 0.5
});
const cylinder = new THREE.Mesh(geometry, material);
cylinder.position.set(0, 2, 0)
// 开启阴影
cylinder.castShadow = true
// 加入场景
scene.add(cylinder);


// 日光照
const light = new THREE.PointLight(0xffffff, 20);
light.position.set(4, 4, 4);
// 开启阴影
light.castShadow = true
scene.add(light);
// 光源辅助
const pointLightHelper = new THREE.PointLightHelper(light, 1);
scene.add(pointLightHelper);

// 平行光
// const directionalLight = new THREE.DirectionalLight(0xffffff, 0.3);
// directionalLight.position.set(2, 3, 2)
// // 阴影抗锯齿
// directionalLight.shadow.mapSize.width = 2048
// directionalLight.shadow.mapSize.height = 2048
// // 开启阴影
// directionalLight.castShadow = true
// scene.add(directionalLight);
// // 光源辅助
// const helper = new THREE.DirectionalLightHelper(directionalLight, 1);
// scene.add(helper);

const lightNor = new THREE.AmbientLight(0xffffff, 0.2); // 柔和的白光
scene.add(lightNor);


// 网格辅助
const gridHelper = new THREE.GridHelper(10, 10, 0xff0000);
scene.add(gridHelper);

const controls = new OrbitControls(camera, renderer.domElement)
// 是否开启惯性
controls.enableDamping = true
// 阻尼惯性有多大
controls.dampingFactor = 0.05
// 是否自动旋转
controls.autoRotate = false
// 围绕目标旋转的速度
controls.autoRotateSpeed = 1


let angle = 0
function animate() {
  angle += 0.005
  light.position.x = 4 * Math.cos(angle)
  light.position.z = 4 * Math.sin(angle)
  requestAnimationFrame(animate)
  renderer.render(scene, camera)
  controls.update()
}

animate()
加载3D模型
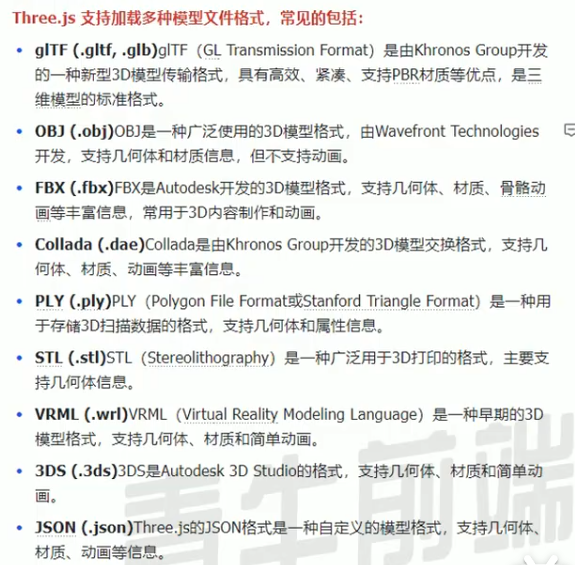
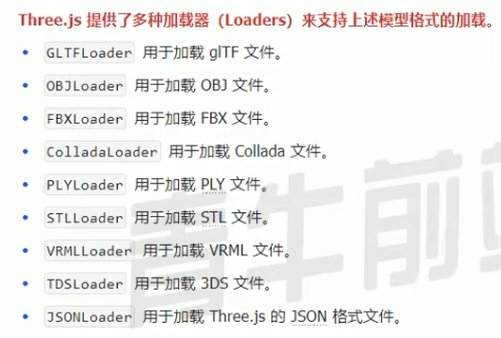
import { GLTFLoader } from "three/examples/jsm/loaders/GLTFLoader.js";


const gLTFLoader = new GLTFLoader()
gLTFLoader.load('../img/Lantern.gltf', function (su) {
  su.scene.position.set(3,2,3)
  scene.add(su.scene)
})如需解压使用DRACOLoader
模型顶点位置
console.log(su.scene.children[0].geometry.attributes.position.array.length);父子元素
即物体加上物体,父级元素移动也会跟随移动
// 物体
const cube = new THREE.Mesh(
  new THREE.BoxGeometry(1, 1, 1),
  new THREE.MeshBasicMaterial()
)
cube.add(child) // 添加子物体
scene.add(cube)
移动
// 位置改变
cube.position.x += 0.01
缩放
cube.scale.x += 0.01旋转
cube.rotation.x += 0.01抗锯齿
const renderer = new THREE.WebGLRenderer({
  antialias: true
})
物体复制
let plane2 = plane.clone()
plane2.position.set(20, 0, 0)
scene.add(plane2)
响应式画布
// 监听窗口变化(画布随窗口尺寸变化而变化)
window.addEventListener('resize', () => {
  // 重置渲染器宽高比
  renderer.setSize(window.innerWidth, window.innerHeight)
  // 重置相机宽高比
  camera.aspect = window.innerWidth / window.innerHeight
  // 更新相机的投影矩阵(防止变形)
  camera.updateProjectionMatrix()
})
全屏
// 全屏
window.addEventListener('dblclick', () => {
  const fullscreenElement = document.fullscreenElement
  if (!fullscreenElement) {
    renderer.domElement.requestFullscreen() // 开启
  } else {
    document.exitFullscreen() // 关闭
  }
})
调试工具
// 引入
import { GUI} from 'three/examples/jsm/libs/lil-gui.module.min.js'

// 使用调试工具
const gui = new GUI()
// 物体属性对象,属性,最小值,最大值,步长
gui.add(cube.position, 'x', -5, 5, 0.1).name('X轴')
gui.add(cube.position, 'y', -5, 5, 0.1).name('Y轴')
gui.add(cube.position, 'z', -5, 5, 0.1).name('Z轴')
gui.add(cube.material, 'wireframe').name('线框模式')
gui.addColor(cube.material, 'color').name('颜色')

// 可分组
const group = gui.addFolder('物体')
group.add(cube.position, 'x', -5, 5, 0.1).name('X轴')
group.add(cube.position, 'y', -5, 5, 0.1).name('Y轴')
group.add(cube.position, 'z', -5, 5, 0.1).name('Z轴')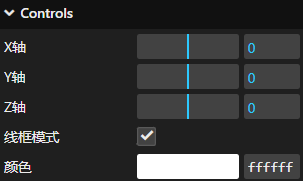
雾
scene.fog = new THREE.Fog( 0xcccccc, 10, 15 );通过向量进行交互
// 交互
// 创建射线
const raycaster = new THREE.Raycaster();
// 创建向量
const mouse = new THREE.Vector2();
// 点击事件
window.addEventListener("click", (event) => {
  // 设置鼠标向量的坐标(归一化)
  mouse.x = (event.clientX / window.innerWidth) * 2 - 1;
  mouse.y = -(event.clientY / window.innerHeight) * 2 + 1;
  // 设置射线的起点和方向
  raycaster.setFromCamera(mouse, camera);
  // 获取射线相交的对象,添加需要交互的对象
  // const intersects = raycaster.intersectObjects(scene.children);
  const intersects = raycaster.intersectObjects([cube, customPlane]);
  // 对点击到的物体操作
  if (intersects.length > 0) {
    //intersects[0].object._originColor = intersects[0].object.material.color; // 保存原有颜色
    intersects[0].object.material.color.set(0x0000ff);
  }
});
补间动画
用于指定位置进行运动
// 导入tween
import * as TWEEN from "three/examples/jsm/libs/tween.module.js";

// 补间动画,加入物体的位置
const tween = new TWEEN.Tween(cube.position);
// 设置目标位置
tween.to({ x: -2 }, 3000);
// 启动
tween.start();
// 停止
//tween.stop();
// 重复(Infinity为无数次)
tween.repeat(Infinity);
// 循环播放
tween.yoyo(true);
// 延迟
// tween.delay(1000);
// 设置缓冲
// tween.easing(TWEEN.Easing.Quadratic.InOut);
// 位置回调
// tween.onUpdate(() => {
//   console.log(cube.position);
// });

function animate() {
  requestAnimationFrame(animate);
  cube.rotation.x += 0.01;
  cube.rotation.y += 0.01;
  renderer.render(scene, camera);
  controls.update();
  // 更新tween
  TWEEN.update();
}

animate();
模型粒子化
获取模型顶点进行计算
// 加载模型
let temp = [];
const gLTFLoader = new GLTFLoader();
gLTFLoader.load("117.glb", function (su) {
  su.scene.position.set(3, 2, 3);
  scene.add(su.scene);
  console.log(su.scene.children[0].geometry.attributes.position.array.length);
  // 获取模型顶点数据
  const geometry = su.scene.children[0].geometry;
  const vertices = geometry.attributes.position.array;
  const vertexCount = geometry.attributes.position.count;

  // 生成大脑粒子位置
  for (let i = 0; i < particlesTotal; i++) {
    // 随机选择模型顶点(考虑模型缩放和位置)
    const index = Math.floor(Math.random() * vertexCount) * 3;
    positions.push(
      vertices[index] * 1180 + 3, // X 坐标(放大并偏移)
      vertices[index + 1] * 1180 + 2, // Y 坐标
      vertices[index + 2] * 1180 + 3 // Z 坐标
    );
    temp.push(
      vertices[index] * 1180 + 3, // X 坐标(放大并偏移)
      vertices[index + 1] * 1180 + 2, // Y 坐标
      vertices[index + 2] * 1180 + 3 // Z 坐标
    );
  }
  console.log(temp);
});