
node-npm
将源换成淘宝镜像
npm config set registry https://registry.npm.taobao.org(失效)

如果出现 npm WARN config global `--global`, `--local` are deprecated. Use `--location=global` instead.
编辑node安装目录下的 npm.cmd,将 prefix-g 改为 prefix --location=global
如果保存时出现管理员问题,右击文件选择属性、安全、改为完全可控

或者更换高版本Node

npm config set registry https://registry.npmmirror.com
常用命令
安装:npm install xxx               -g 全局
卸载:npm uninstall xxx             -g 全局
查询版本:npm info sass versions
重新安装模块:npm rebuild node-sass
Vite项目创建
使用npm -v查看安装的版本
# npm 6.x
npm init vite@latest my-vue-app --template vue

# npm 7+, 需要额外的双横线:
npm init vite@latest my-vue-app -- --template vue

# ts版本
npm create vite@latest my-vue-app -- --template vue-ts

yarn create vite my-vue-app --template vue
注意:尽量看官方文档的创建方式
Vite基于Vue3,想学习更多Vue3知识,可以到Vue3中文文档查看
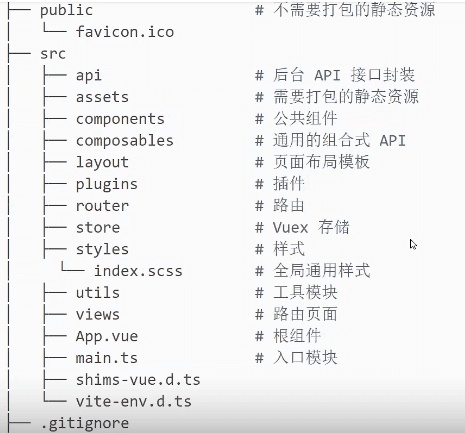
项目目录结构:
sass
npm install sass
使用示例
<style scoped lang="sass">
ul
  li
    list-style: none
</style>
在VSCode的扩展中安装插件Sass才会有代码提示,记得重启VSCode
router
// 官方安装方式
npm install vue-router@4
// 指定版本安装方式
npm install vue-router@4.0.3
创建router/index.js
import {createRouter, createWebHashHistory} from 'vue-router'

const router = createRouter({
  // history模式:createWebHistory(), hash模式:createWebHashHistory()
  history: createWebHashHistory(),
  routes: [
    {
      path: '/',
      component: () => import('../components/TestVue.vue'),
      meta: {
        title: '范先生'
      }
      //redirect: '/countIndex'
    },
  ],
})

router.beforeEach((to, from, next) => {
    /* 路由发生变化修改页面title */
    if (to.meta.title) {
        document.title = to.meta.title
    }
    next()
})

export default router
注意:引入vue文件时需要全称,不能省略.vue
main.js引用
// 也就是router目录,默认index.js,名称不一样需要指定全称
import router from './router'
const app = createApp(App)
app.use(router)
app.mount('#app')
别忘了在App.vue中加上<router-view></router-view>
添加非菜单路由
创建router/other.js
/**
 * 不属于菜单的路由
 */
export default [
    {
        path: 'trading/details',
        component: () => import('../components/trading/CollectOrderDetails.vue')
    },
]
在index.js中引入
import other from "./other"
...other,
路由传参
// 跳转带参数
this.$router.push({path: '/main/school/grade', query: {schoolId: item.schoolId}})
// 获取参数
this.$route.query.activity

// V3方式
router.push({path: '/home/nonage_details', query: {id: item.minorId}})
router.currentRoute.value.query.id

// 动态路由
// 第一步
{
  path: '/article/:id',
  component: () => import('../view/Article.vue'),
},
// 第二步
router.push({path: '/article/202301010800'})
// 第三步
import { useRoute } from 'vue-router'
console.log(useRoute().params.id)
路由变化页面不刷新问题
找到的方法是给router-view绑定一个key,来保证路由的唯一性
<router-view :key="routerFullPath"/>

let routerFullPath = ref('')

watch(router.currentRoute, () => {
  routerFullPath.value = router.currentRoute.value.fullPath
})
修复锚点使用也会刷新问题,没有使用到锚点可不做处理
watch(router.currentRoute, () => {
  let fullPath = router.currentRoute.value.fullPath
  let index = fullPath.indexOf('#');
  if (index > -1) {
    fullPath = fullPath.substring(0, index)
  }
  routerFullPath.value = fullPath
})
首页重定向问题
如果想首页重定向到某个组件,而又不想地址栏变化,可以使用子路由加空路由实现
{
  path: '/',
  component: () => import('../views/Home.vue'),
  meta: {
    title: 'FANMR.CN'
  },
  // redirect: '/index',
  children: [
    {
      path: '',
      component: () => import('../views/Index.vue'),
      meta: {
        title: 'FANMR.CN'
      }
    },
    {
      path: 'article/:id',
      component: () => import('../views/Article.vue'),
      meta: {
        title: '详情'
      }
    }
  ]
},
Vuex
npm install vuex@next
创建store/index.js
import {createStore} from 'vuex'

const store = createStore({
  // 数据
  state: {
    count: 0,
  },
  // 数据变动方法
  mutations: {
    increment(state) {
      state.count++;
    },
    // 同步处理,state中的属性值,只能在这里修改
    updateValue(state, value) {
      state.testValue = value
    }
  },
  actions: {
  },
  modules: {
  }
});

export default store
在main.ts中使用,也可单独引入使用(推荐),不用全局注册,好处是所有地方都能引入并使用,减少依赖
import store from './store'

app.use(store)
用法
// 取
this.$store.state.userData
<div :class="{menuActive: $store.state.menuActiveIndex === '1'}" @click="menuIndexChange('1')"><i class="fa fa-home"></i> 首页</div>

// 存
this.$store.commit('setValue',xxx)

// 数据变动方法
mutations: {
// 导航激活菜单
menuActiveIndexChange(state, index) {
    state.menuActiveIndex = index
  },
},
页面刷新数据丢失问题,在app.vue中添加
<script>
export default {
  created() {
    /**
     * 防止页面刷新Vuex数据丢失
     */
    //在页面加载时读取sessionStorage里的状态信息
    if (sessionStorage.getItem("store")) {
      this.$store.replaceState(Object.assign({}, this.$store.state, JSON.parse(sessionStorage.getItem("store"))))
      // 清空
      sessionStorage.clear()
    }
    //在页面刷新时将vuex里的信息保存到sessionStorage里
    window.addEventListener("beforeunload", () => {
      sessionStorage.setItem("store", JSON.stringify(this.$store.state))
    })
  }
}
</script>
Ts
<template>
  <router-view/>
</template>

<script setup lang="ts">
import store from './store'
/**
 * 防止页面刷新Vuex数据丢失
 */
// 在页面加载时读取sessionStorage里的状态信息
if (sessionStorage.getItem("sw_hostel_store")) {
  store.replaceState(Object.assign({}, store.state, JSON.parse(sessionStorage.getItem("sw_hostel_store"))))
  // 清空
  sessionStorage.clear()
}
// 在页面刷新时将vuex里的信息保存到sessionStorage里
window.addEventListener("beforeunload", () => {
  sessionStorage.setItem("sw_hostel_store", JSON.stringify(store.state))
})
</script>

<style lang="sass">
</style>
element+
官网有详细文档:element plus
npm install element-plus --save
使用
main.js中使用
import ElementPlus from 'element-plus';
import 'element-plus/lib/theme-chalk/index.css';

const app = createApp(App)
app.use(ElementPlus)
app.mount('#app')
注意:在版本^1.0.2-beta.41发现,如果使用的是Vite,请使用JavaScript语言而不要使用TypeScript语言,否则打包会出错导致无法打包
注意:如果出现图标无法正常显示的情况,在引入css的下面再次引入scss,但是要确保安装了sass解析
import 'element-plus/packages/theme-chalk/src/base.scss'
自动导入功能
测试版本:1.2.0-beta.3,
安装插件npm install unplugin-vue-components
在Vite中添加配置
// vite.config.ts
import Components from 'unplugin-vue-components/vite'
import { ElementPlusResolver } from 'unplugin-vue-components/resolvers'

export default {
  plugins: [
    // ...
    Components({
      resolvers: [ElementPlusResolver()],
    }),
  ],
}
该方法不需要再main.js中进行任何配置,直接使用,不需要导入
Axios
npm install axios
配置文件http.js
import axios from 'axios'

// 1-本地,2-测试,3-正式
let env = 2

let api = ''

switch (env) {
  case 1:
    api = ''
    break
  case 2:
    api = ''
    break
  default:
    api = 'http://localhost'
}

// axios配置
const http = axios.create({
  baseURL: api,
  timeout: 1000 * 30, // 请求超时,秒
  // 携带cookie
  withCredentials: true,
  // headers: {'content-type': 'application/x-www-form-urlencoded'} // 请求数据类型 默认application/json
})

// 请求拦截器
http.interceptors.request.use(config => {
  // 如果要携带头部数据,如token,在此写,不要写在create中,create启动就会创建,需要刷新才会更新
  config.headers['token'] = localStorage.getItem('token')
  return config;
}, function (error) {
  // 请求错误的执行
  return Promise.reject(error);
});

// 响应拦截器
http.interceptors.response.use(response => {
  return response;
}, function (error) {
  return Promise.reject(error);
});

export default http
绑定到Vue
app.config.globalProperties.http = http
POST请求示例
proxy.http.post('/admin/details', {
  pageIndex: listData.pageIndex,
  pageSize: listData.pageSize,
}).then(res => {
  if (res.code === 200) {
    listData.list = res.data.list
    listData.count = res.data.count
  } else {
    proxy.msg(res)
  }
  proxy.loadingClose()
}).catch(() => {
  proxy.msg({})
  proxy.loadingClose()
})
图标Font Awesome
npm install font-awesome

// main中
import 'font-awesome/css/font-awesome.css'
配置
在项目根目录下创建vite.config.ts或vite.config.js
const path = require('path')
export default function () {
  return {
    // 代理,最重要,其他的都可以有默认配置
    proxy: {
      '/api': {
        target: 'http://localhost:80',
        changeOrigin: true,
        rewrite: path => path.replace(/^\/api/, '')
      }
    },
    // 打包后的跟路径
    base: '/',
    // 端口
    // port: 3001,
    // 是否自动开启浏览器
    open: true,
  }
}
热更新问题
import {defineConfig} from 'vite'
import vue from '@vitejs/plugin-vue'

// https://vitejs.dev/config/
export default defineConfig({
  plugins: [vue()],
  devServer: {
    contentBase: './dist', //为./dist目录中的静态页面文件提供本地服务渲染,有热更新作用,不指定样式文件需要刷新
    //open: true          //启动服务后自动打开浏览器网页
  }
})
解耦问题
在Vue3正式版发布之后,也尝试了对旧项目进行升级,记录以下问题
- 项目中使用的任何组件最好都进行封装,即便是套个壳,在将来换组件时也能在封装层进行调整和更换,禁止在Vue页面代码中大量直接使用某个三方组件,在后期的维护和改造中工作量将非常大
接口
/**
 * 接口
 */
export default {

  // 登录
  login: '/login',

}
Vue前端验证插件
基于vue3.x的组织架构图
多环境配置
在配置文件vite.config.js中配置环境配置文件位置,默认在根路径下
export default defineConfig({
  envDir: "./viteEnv", // 指定环境配置文件路径,相对路径、绝对路径都可以
  envPrefix: ["vite", "env"], // 指定环境配置文件要读的开头前缀,默认只有VITE
})
创建viteEnv目录,并根据自己的需要配置环境文件,注意:与vite.config.js文件同级位置
/viteEnv
  |--.env.dev
  |--.env.test
  |--.env.prod
在各环境文件中指定需要的变量
// 环境标识
vite_env = dev
// 接口请求地址
env_http_api = http://localhost:19099
// 一张网请求地址
env_visual_http = http://localhost:5500/main.html
编辑package.json根据启动命令来指定环境,注意指定名称与配置的名称一致
"scripts": {
  "dev": "vite --mode dev",
  "test": "vite --mode test",
  "prod": "vite --mode prod",
  "build:test": "vite build --mode test",
  "build:prod": "vite build --mode prod",
  "preview": "vite preview"
},
最后配置的环境变量会在import.meta.env变量中暴露使用,如:
let api = import.meta.env.env_http_api
Pinia
Pinia也是状态管理,与Vuex不同的是:
- Pinia支持Vue3的选项式API和组合式API
- Pinia没有mutations,只有state、getters、actions
- Pinia分模块不需要modules
- TypeScript支持很好
- 自动化代码拆分
- Pinia体积更小,性能更好
其中的没有mutations,能直接修改和使用数据,更加方便
// 安装
npm install pinia

// 在main中使用
import { createPinia } from 'pinia'
app.use(createPinia())

// 定义(store/index.js)
import {defineStore} from 'pinia'

export const useStore = defineStore('storeId', {
  // 推荐使用 完整类型推断的箭头函数
  state: () => {
    return {
      // 所有这些属性都将自动推断其类型
      counter: 0,
      name: 'Eduardo',
      isAdmin: true,
    }
  },
})

// 使用
import { userStore } from '../store'
const store = userStore()

console.log(store.count)
分模块
持久化
第一步:通过Pinia插件快速实现持久化存储
npm i pinia-plugin-persistedstate
第二步:在main.ts中注册
import persistence from 'pinia-plugin-persistedstate'

app.use(createPinia().use(persistence))
第三步:模块开启持久化
const useHomeStore = defineStore("home",{
  // 开启数据持久化
  persist: true
  // ...省略
  // 或者
  persist: {
    enabled: true,
    // 默认LocalStorage
    storage: sessionStorage,
  },
});
npm警告

解决办法:编辑node安装目录的npm.cmd(给予管理员权限)
将
prefix -g
更改为
prefix --location=global
yarn
npm i -g yarn
yarn --version

yarn init - 初始化新项目并创建 package.json 文件
yarn add [package] - 将一个或多个包添加到项目中
yarn remove [package] - 从项目中移除一个或多个包
yarn install - 安装项目中所有依赖项
yarn upgrade [package] - 更新一个或多个包至最新版本
yarn run [script] - 运行在 package.json 中定义的脚本
yarn build - 执行构建命令以生成生产环境所需的文件
yarn start - 启动应用程序或服务器
yarn test - 运行测试套件
Vu3连续滚动插件
vue3打印插件
vue3-print-nb
Naive UI
过渡动画出现两个页面
https://blog.csdn.net/weixin_42966151/article/details/128384852
v-html中代码高亮方案
安装插件yarn add highlight.js,在组件中引入使用,由于是动态插入的,需要在渲染完成后执行
import { nextTick } from 'vue'
import hljs from 'highlight.js'

// 在需要的地方执行代码高亮
nextTick(() => {
  document.querySelectorAll('pre code').forEach((el) => {
    hljs.highlightElement(el)
  })
})
