修改node_modules方式
在使用过程中如果出现了修改node_modules包下文件的情况,对于本地使用没有影响,但是再次安装时(npm install),node_modules下的文件都会恢复到安装时的样子,对于这种情况需要使用包管理工具解决
第一步:安装工具包
npm i patch-package
第二步:调整package.json,在script中加入
"postinstall": "patch-package"
第三步:修改node_modules下的文件
第四步:使用工具生成补丁
npx patch-package 包名
如:npx patch-package hexo-generator-category
然后记得把生成的patches目录一起提交即可,下次执行npm install时,工具会自动执行npm run postinstall这个命令,将patches目录下的补丁打到node_modules下
之后的node_modules下文件修改后记得执行生成补丁命令即可
自定义代办事项样式
代办事项语法:
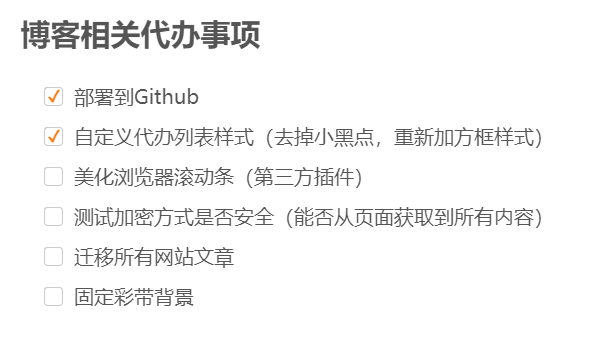
# 博客相关代办事项

* [x] 部署到Github
* [x] 自定义代办列表样式(去掉小黑点,重新加方框样式)
* [ ] 美化浏览器滚动条(第三方插件)
* [ ] 测试加密方式是否安全(能否从页面获取到所有内容)
* [ ] 迁移所有网站文章
* [ ] 固定彩带背景
浏览器默认的样式前面会多个小黑点,同时方框在不同的浏览器样式不一致,可以美化一下,首先在样式文件中加入美化的样式代码
文件位置:next/source/css/main.styl
/* 代办事项 */
input {
  position: relative;
  top: 1px;
}
input[type='checkbox'] {
  position: relative;
  width: 14px;
  height: 14px;
  font-size: 14px;
  margin-right: 5px;
}
/* 遮住原有 */
input[type='checkbox']::after {
  border-radius: 3px;
  position: absolute;
  top: 0;
  background-color: white;
  color: #000;
  width: 15px;
  height: 15px;
  display: inline-block;
  padding-left: 0;
  text-align: center;
  content: ' ';
  box-sizing: border-box;
  border: 1px solid #ccc;
}
/* 已完成样式 */
input[type='checkbox']:checked::before {
  content: '✓';
  font-size: 13px;
  font-weight: bold;
  color: #ff7600;
  position: absolute;
  display: inline-block;
  z-index: 10;
  top: 0;
  left: 3px;
}
然后在next/layout/_layout.njk文件中body结束前加入去掉小黑点的代码
<script type="text/javascript">
  // 代办事项样式
  $("input[type='checkbox']").parents("li").css({"list-style-type": "none", "margin-left": "-21px"})
</script>
注意:开启异步加载后,小黑点去除不彻底,仅页面刷新会有效果,而pjax刷新的内容无法执行该代码,解决办法是让pjax执行时再次执行该代码,将上面的代码改为
<script type="text/javascript" data-pjax>
  // 代办事项样式
  deleteTODO()
  // 使用函数方式包裹代码是防止再次执行时出现变量冲突问题
  function deleteTODO() {
    $("input[type='checkbox']").parents("li").css({ "list-style-type": "none", "margin-left": "-21px" })
  }
</script>
更改分类中文章排序方式
梳理了一下各个页面的排序方式,发现分类中的文章是按照时间倒序展示,有点别扭,感觉调整为时间正序排序比较好。调整方式:编辑node_modules/hexo-generator-category/lib/generator.js,将-date改为date即可
自动分类插件
文章多了发现手动维护分类是一个麻烦的事情,一旦碰到更改分类名的情况更是头痛,偶然发现一个自动分类插件,根据文件的文件夹进行分类名的维护,支持多级分类(即多级文件夹)
地址:https://github.com/xu-song/hexo-auto-category
npm install hexo-auto-category
在站点根目录下的_config.yml添加
auto_category:
 enable: true
 # 可指定目录深度
 depth:
注意:该插件在hexo s运行的情况下直接重命名文件夹偶尔会出问题,严重可能文章内容丢失!可能原因是Hexo会去维护所有的文章文件,这个时候偶尔会出现文件已存在的异常,而此时执行该自动分类插件的代码时,其中文章数据的内容是空的,而插件作者没有做这种情况的处理,直接进行了文件内容写入,导致文件内容直接丢失
自动分类插件的修复及升级
基于以上问题进行了修复和升级,实现了以下功能
- 自动维护分类(保留多级分类)
- 自动维护文章名
- 自动维护排序
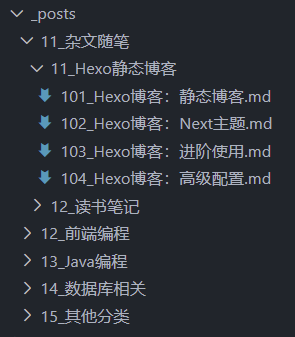
例如这是我的结构目录,有顺序的文章管理,有逻辑和层次性,而不是编辑器中根据文件名随意放置,而博客页面按照时间进行排序
然后需要实现的是文章中的标题根据文件名自动更改,而分类中的排序不再根据时间排序,而是我指定的排序方式,这样文章的排序更加有逻辑性,也更好插入新的文章进行排序

在安装的插件hexo-auto-category中进行更改,目录为:node_modules/hexo-auto-category/
将lib/logic.js的内容更改为以下内容
'use strict';

var front = require('hexo-front-matter');
var fs = require('hexo-fs');
debugger;
let logic = function (data) {
    var log = this.log;

    if (data.layout != 'post')
        return data;
    if (!this.config.render_drafts && data.source.startsWith("_drafts/"))
        return data;
    // 修复更改文件夹后没有内容会空写入情况(文章内容会丢失问题)
    if (data.content.length == 0)
        return data

    let postStr;
    var tmpPost = front.parse(data.raw);
    var categories = data.source.split('/');
    var depth = categories.length - 2;
    if (depth == 0) {
        return data;
    }
    var newCategories = categories.slice(1, 1 + Math.min(depth, categories.length - 2));
    let postCategories
    if (tmpPost.categories) {
        postCategories = tmpPost.categories;
        if (typeof (tmpPost.categories) === "object") {
            postCategories = tmpPost.categories.join("_");
        }
    }
    // 设置新的分类
    tmpPost.categories = newCategories

    // 自定义排序
    var titleStr = categories[categories.length - 1]
    var titleAndSort = titleStr.split('_')
    var title = titleAndSort[1].replace('.md', '')
    var sort = parseInt(titleAndSort[0])

    if (postCategories == newCategories.join("_") && tmpPost.title == title && tmpPost.sort == sort) {
        return data;
    }

    // 设置标题
    tmpPost.title = title
    // 设置排序号
    tmpPost.sort = sort

    postStr = front.stringify(tmpPost);
    postStr = '---\n' + postStr;
    fs.writeFile(data.full_source, postStr, 'utf-8');
    log.i("自动维护文章: %s", title);
    return data
}

module.exports = logic;
更改后,配置文件中不用再指定开启也不会报错,保存文章也会自动更新,但是文章的名称前需要指定排序的数字,即_不能缺少
然后更改分类中的文章排序方式,编辑node_modules/hexo-generator-category/lib/generator.js,将-date改为sort即可。这样更改后就能更加专注于文章,减少文章头部的维护
注意:在使用中发现VsCode文件夹排序有问题,两个并列的Ⅰ和Ⅱ开头的文件夹,Ⅱ居然在上面,是由VsCode的排序问题造成的,需要对VsCode进行配置

但是又出现了新的问题,数字10会在1之前,我这里的解决办法是将排序号的数字从101开始
自动分类后页面调整
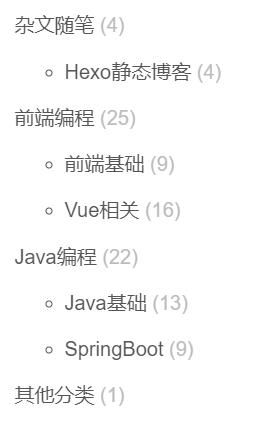
按照上面的方式调整后,页面的展示有了更强的顺序逻辑性,但是发现在分类和文章头部出现了很多不必要的数字,其实对于展示还是不够美观的
所以需要针对多出来的数字进行处理。
首先对于文章头部的分类,由于无法直接操作到分类的文字,全局查阅性能不高,于是给它加个class便于操作
编辑next/layout/_partials/post/post-meta.njk,将下面的代码中加入新的class,取名category-head-item
<span itemprop="about" itemscope itemtype="http://schema.org/Thing">
  <a href="{{ url_for(cat.path) }}" itemprop="url" rel="index"><span class="category-head-item" itemprop="name">{{ cat.name }}</span></a>
</span>
然后在next/layout/_layout.njk中加入处理代码,与代办事项同理,如果使用了异步加载,需要加上data-pjax让pjax再次执行
<script type="text/javascript" data-pjax>
  // 去除分类名前的序号
  deleteSort()
  function deleteSort() {
    // 文章头部分类
    let allItem1 = $('.main').find('.category-head-item')
    for (item of allItem1) {
        $(item).html($(item).text().replace(/[1|2|3|4|5|6|7|8|9][0|1|2|3|4|5|6|7|8|9]_/g, ''))
    }
    // 分类页面中
    let allItem2 = $('.main').find('.category-list-link')
    for (item of allItem2) {
        $(item).html($(item).text().replace(/[1|2|3|4|5|6|7|8|9][0|1|2|3|4|5|6|7|8|9]_/g, ''))
    }
    // xxx分类下文章页
    let allItem3 = $('.main').find('.collection-header')
    for (item of allItem3) {
        $(item).html($(item).text().replace(/[1|2|3|4|5|6|7|8|9][0|1|2|3|4|5|6|7|8|9]_/g, ''))
    }
  }
</script>
正则可以根据自己的习惯做调整进行匹配。调整后的效果

侧边标签改运行天数
因为使用不到标签,同时不想为文章加标签,也从来没有通过标签查找过文章,所以将侧边标签改为了运行天数展示

首先将文件next/layout/_partials/sidebar/site-overview.njk中的以下代码:
{%- if site.tags.length > 0 %}
  {%- set tagsPageQuery = site.pages.find({type: 'tags'}, {lean: true}) %}
  {%- set hasTagsPage = tagsPageQuery.length > 0 %}
  <div class="site-state-item site-state-tags">
    {%- set tag_dir = theme.menu.tags.split('||')[0] | trim if theme.menu.tags else config.tag_dir + '/' %}
    {%- if hasTagsPage %}
      <a href="{{ url_for(tag_dir) }}">
    {%- endif %}
    <span class="site-state-item-count">{{ site.tags.length }}</span>
    <span class="site-state-item-name">{{ __('state.tags') }}</span>
    {%- if hasTagsPage %}</a>{% endif %}
  </div>
{%- endif %}
替换为:
<div class="site-state-item site-state-tags">
  <span class="site-state-item-count run-days">0</span>
  <span class="site-state-item-name">运行</span>
</div>
然后在文件next/layout/_layout.njk中body结束前加上以下代码:
<script type="text/javascript">
  // 运行时长
  let timer = new Date().getTime() - 1673830800000 // 开始时间戳
  $('.run-days').html(parseInt(timer / 1000 / 60 / 60 / 24))
</script>
canvas-nest
网页背景效果,地址:https://github.com/hustcc/canvas-nest.js
添加方式是在文件next/layout/_layout.njk中body结束前加上以下代码:
<script src="//cdn.bootcss.com/canvas-nest.js/1.0.1/canvas-nest.min.js"></script>
VsCode文章头自动生成
使用到的是VsCode的用户代码片段,设置、用户代码片段,找到Markdown文件的配置,在其中添加以下配置:
"header info": {
    "prefix": "info",
    "body": [
      "---",
      "title: xxx",
      "categories:",
      "  - xx",
      "  - xx",
      "sort: 1",
      "date: ${CURRENT_YEAR}-${CURRENT_MONTH}-${CURRENT_DATE} ${CURRENT_HOUR}:${CURRENT_MINUTE}:${CURRENT_SECOND}",
      "updated: ${CURRENT_YEAR}-${CURRENT_MONTH}-${CURRENT_DATE} ${CURRENT_HOUR}:${CURRENT_MINUTE}:${CURRENT_SECOND}",
      "---",
      "",
            ""
    ],
    "description": "hexo post header info template"
}
注意:此时是无法使用的,即便配置的是全局的代码片段,对Markdown文件也是无效的,需要配置VsCode,在设置中搜索markdown找到某处可以点击在 seetings.json 中编辑进入文件,或者直接在硬盘上搜索C:\Users\Administrator\AppData\Roaming\Code\User\settings.json文件,在其中加入以下配置:
"[markdown]": {
    "editor.quickSuggestions": {
        "other": "on",
        "comments": "on",
        "strings": "on"
    }
}
然后在头部打info即会出现提示,配合上面升级的自动分类插件,即可不用管文章头部的任何配置
同理可以加段more的代码片段
"post more split": {
    "prefix": "more",
    "body": [
  "<!-- more -->"
    ],
    "description": "post more split template"
},
优化文章管理
在使用过程中发现,分类、文章的排序对于文章的查阅非常重要,简单的给文章加序号并不好维护文章的增加问题,而且插入新文章修改序号也很麻烦,在文章多了后查找到文章进行修改也不方便,所以借助于VSCode编辑器的跳转功能,加了一个文件来管理所有的文章,同时自动调整其他文章的序号、名称、分类
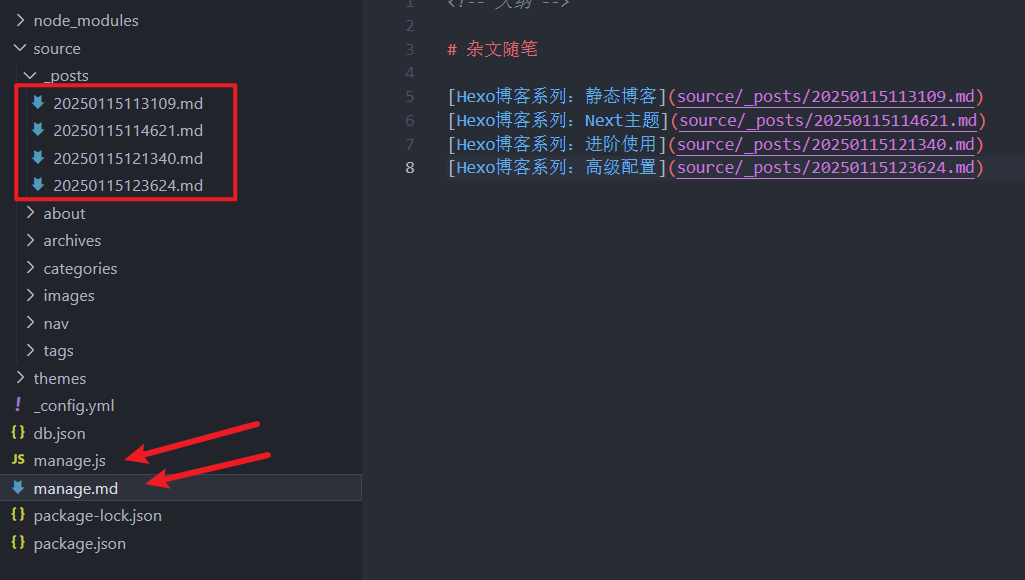
创建manage.md文件,点击链接就能跳转,没有还会提示创建文件
<!-- 大纲 -->

# 杂文随笔

[Hexo博客系列:静态博客](source/_posts/20250115113109.md)
[Hexo博客系列:Next主题](source/_posts/20250115114621.md)
[Hexo博客系列:进阶使用](source/_posts/20250115121340.md)
[Hexo博客系列:高级配置](source/_posts/20250115123624.md)
同时创建manage.js脚本,需要维护的时候执行node manage.js即可
let fs = require('fs')

function start() {
  // 读取管理文件
  let data = readFile('manage.md')
  // 按行进行拆分
  let dataLine = data.split('\n')
  let cateName = ''
  let sort = 1
  for (const item of dataLine) {
    if (item.indexOf('# ') > -1) {
      // 分类名称
      cateName = item.replaceAll('# ', '')
    } else if (item.indexOf('](') > -1) {
      // 文章
      let articleNameStr = item.replaceAll(' ', '')
      let index = articleNameStr.indexOf('](')
      let articleName = articleNameStr.substring(1, index)
      let articlePath = articleNameStr.substring(index + 2, articleNameStr.length - 2)
      // 修复最后一个没有md的情况
      if (!articlePath.endsWith('.md')) {
        articlePath = articlePath + "d"
      }
      // 执行替换
      let articleContent = readFile(articlePath)
      let articleContentLine = articleContent.split('\n')
      articleContentLine[1] = 'title: '+ articleName
      articleContentLine[2] = 'categories: '+ cateName
      articleContentLine[3] = 'sort: '+ sort
      writeFile(articlePath, articleContentLine.join('\n'))
      sort++
    }
  }
  console.log('执行完毕...');

}

/**
 * 读取数据
 */
function readFile(path) {
  try {
    return fs.readFileSync(path, { encoding: 'utf-8' })
  } catch (e) {
    return ''
  }
}

/**
 * 写入数据
 */
function writeFile(path, content) {
  fs.writeFileSync(path, content)
}

// 执行
start()
由于个人使用比较简单,所以只硬性的修改了文章头部信息的前三个数据,也就指定了第一行为标题、第二行为分类、第三行为排序号
---
title: Hexo博客系列:高级配置
categories: 杂文随笔
sort: 4
date: 2025-01-15 12:36:53
updated: 2025-01-15 12:36:56
tags:
  - Hexo
  - 博客
  - Next
---
使用该方式后,记得分类中的排序方式是需要在_config.yml配置文件中进行调整的
# Pagination
## Set per_page to 0 to disable pagination
per_page: 1000
pagination_dir: page
category_generator:
  order_by: sort
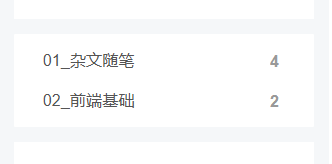
优化分类排序
使用了以上方法后,文章的排序、管理就方便了,这里是如何调整分类的排序方式,依然采用上述方法,增加序号,分类的序号比较好调整和管理

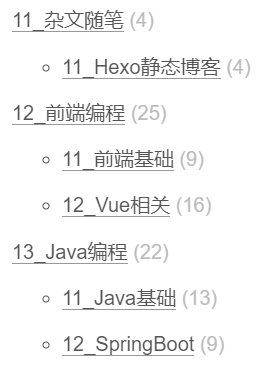
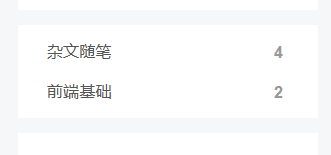
然后就会出现带序号的分类名称
然后进行去除序号,在layout/_partials/post/post-meta.njk中给加class名category-head-item
<span itemprop="about" itemscope itemtype="http://schema.org/Thing">
  <a href="{{ url_for(cat.path) }}" itemprop="url" rel="index"><span class="category-head-item" itemprop="name">{{ cat.name }}</span></a>
</span>
然后在layout/_layout.njk中加入处理逻辑代码,body结束前
<script type="text/javascript" data-pjax>
  // 去除分类名前的序号
  deleteSort()
  function deleteSort() {
    // 文章头部分类
    let allItem1 = $('.main').find('.category-head-item')
    for (item of allItem1) {
        $(item).html($(item).text().replace(/[0|1|2|3|4|5|6|7|8|9][0|1|2|3|4|5|6|7|8|9]_/g, ''))
    }
    // 分类页面中
    let allItem2 = $('.main').find('.category-list-link')
    for (item of allItem2) {
        $(item).html($(item).text().replace(/[0|1|2|3|4|5|6|7|8|9][0|1|2|3|4|5|6|7|8|9]_/g, ''))
    }
    // xxx分类下文章页
    let allItem3 = $('.main').find('.collection-header')
    for (item of allItem3) {
        $(item).html($(item).text().replace(/[0|1|2|3|4|5|6|7|8|9][0|1|2|3|4|5|6|7|8|9]_/g, ''))
    }
  }
</script>
最后引入JQ,下载后放在next/source/,然后在_layout.njk的head中引入
<script src="/jquery-3.7.1.min.js"></script>
图片自定义宽度
在不改源代码的情况下,可以使用HTML语言直接定义图片宽度
<img alt="" src="../images/20250116154248.png" width="500" />
而对于markdown语言来说,默认的![]()语法需要调整解析器源代码才可以,将node_modules\hexo-renderer-marked\lib\renderer.js中的alt替换为width即可
let out = `<img src="${encodeURL(href)}"`;
if (text) out += ` alt="${text}"`;
if (title) out += ` title="${title}"`;
if (lazyload) out += ' loading="lazy"';
替换后
let out = `<img src="${encodeURL(href)}"`;
if (text) out += ` width="${text}"`;   // 替换处
if (title) out += ` title="${title}"`;
if (lazyload) out += ' loading="lazy"';
增加动态背景
在themes\next\layout\_layout.njk中</body>结束前加上
<script type="text/javascript" color="0,0,255" opacity='0.7' zIndex="-2" count="99" src="//cdn.bootcss.com/canvas-nest.js/1.0.0/canvas-nest.min.js"></script>
侧边分类调整到目录上
使用发现目录是有粘性的,页面滚动也能看见,而之前定义的侧边分类不行,当文章下滑到底部,再点击分类就比较麻烦,所以可以将其调整到目录上方
在layout\_macro\sidebar.njk中加入
<div class="sidebar-inner {% if display_toc %}sidebar-nav-active sidebar-toc-active{% else %}sidebar-overview-active{% endif %}">
      <div class="cateCustom">{% include '_partials/page/categoriesCustom.njk' %}</div>  # 新增代码
      <ul class="sidebar-nav">
添加样式:
// 自定义分类样式调整(目录上)
.cateCustom {
  display: flex;
  margin-bottom: 15px;
}
.cateCustom .category-all {
  margin-top: 0;
}
.cateCustom li {
  padding: 0 13px;
}
.cateCustom .category-all-page {
  width: 100%;
}
.cateCustom .category-list-item {
  margin: 0;
  position: relative;
  transition: all .2s;
  border-radius: 3px;
}
.cateCustom .category-list-item:hover {
  background-color: #f5f5f5;
}
.cateCustom a {
  font-size: 0.8125em;
  border-bottom: none;
  display: block;
  width: 100%;
  height: 32px;
  text-align: left;
  line-height: 32px;
}
.cateCustom .category-list-count {
  float: right;
  position: relative;
  top:-24px;
  right: 0;
  background: none;
  color: #999;
  text-shadow: none;
}
调整导航hover
// 导航背景
.menu-item {
  padding: 0 10px;
}
.menu-item a {
  border-radius: 3px;
  padding: 5px 12px;
}